Not much to report. More grinding. Left quarter-panel is bare steel. Still need to hit the right quarter-panel and the roof. Should get more time this weekend to make some magic happen.
Still to do.
Grind quarter-panels to bare steel.
Remove weather stripping and grind tail panel to bare metal.
Grind roof to bare steel
Remove glass and weather stripping from hatch and grind to bare metal.
Remove weatherstripping and grind door jambs to bare metal.
Strip doors, fenders, hood and headlight buckets to bare metal.
Strip engine bay of wires and unnecessary components and prep for paint.
Dry ice interior and remove sound proofing.
Weld in patches to cure rust.
Fabricate new inner wheel well liner.
Modify body for flares.
Acquire front air dam and rear spoiler
This all has to be done before the paint process can start. I'll cross things off as we go.
Tuesday, April 30, 2013
Monday, April 22, 2013
Spark's.
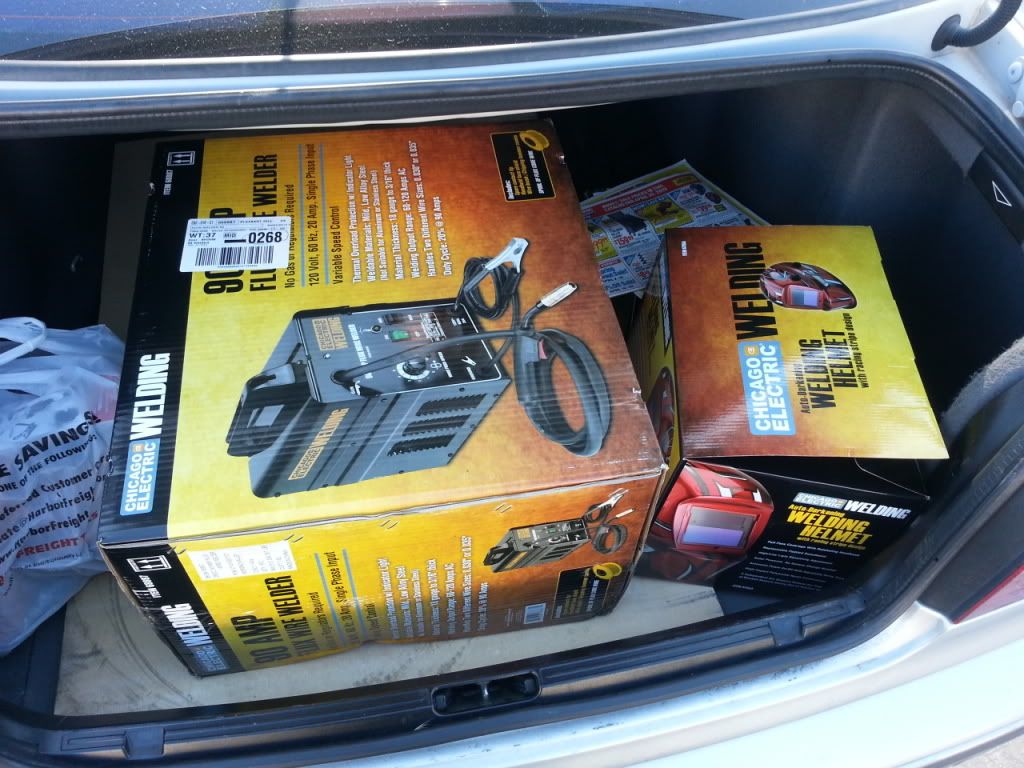
So, I bought a welder. Now there's no stopping till we're ready to primer. We should be able to prep and repair rust. Looking to make some serious progress this weekend.
Wednesday, April 17, 2013
Body: How this is going to go.
I thought with us starting to strip our body down, now would be a good time to lay the process out so that we make sure not to forget anything.
Step 1. Strip our chassis down to bare metal. This includes the interior. Step one is the longest step. The interior needs to be dry-iced. All paint and body filler needs to be stripped. The engine bay needs to be stripped of all the now unnecessary lines and hoses.
Step 2. Welding. Repair the holes in the floor boards. Plug the antenna hole. Fix the fender liner and remove the battery tray. Weld shut any holes in the firewall that are no longer needed. Fix the seat brackets.
Step 3. Repair any major dents as best as possible. If we can't make it perfect, we'll use body filler to make it smooth later.
Step 4. Remove hood. Remove fenders. Remove front lower valances and grill. Remove doors. Remove hatch. If any of those parts are damaged beyond repair, replace with fiberglass if possible.
Step 5. Clean metal with acid. Lay down 1-2 coats of rust encapsulating etching primer. This will adhere to the bare metal. The interior will get a rust encapsulation primer as well, but a much thicker coating to help with noise.
Step 6. Body filler for any dents that weren't made perfect during step 3. Body filler will adhere better to the primer.
Step 7. 1 more coat of primer over the car over the body filler. Maybe 2 if needed.
Step 8a. Light sand the primer and lay down color. All door jambs, interior under the carpet and the engine bay will all be the same color.
Step 8b. Light sand and color again. Depending on the paint and the color we will have to sand between coats and we might need a clear coat.
Step 9. Reinstall painted fenders, doors, hood and hatch.
That's pretty much it. Interior can then go together, and assembling the engine bay is it's own ball of work.
Sunday, April 14, 2013
Body: Progress is the sound of a grinder.
First things first, we built an engine stand.

Rated to 1000lbs, this stand will hold any engine we can mount on it.
Short story, watch this.
For more about, what we did read on.
We got to our first day of working on the car. After stripping emblems and light fixtures, my trusty assistant got to work removing the taillight panels.

The end product of her hard work?

No hidden rust in our taillight panel.
After about an hour of grinding we were at a stop. We made some good progress though.
Right side.

Left side.

Unfortunately, we did find some not so great things on the left side.
 See that white on the border of the paint? That's body filler. The sheet metal is dimpled. It's hard to see in pictures and in the video, but it's there.

Rated to 1000lbs, this stand will hold any engine we can mount on it.
Short story, watch this.
For more about, what we did read on.
We got to our first day of working on the car. After stripping emblems and light fixtures, my trusty assistant got to work removing the taillight panels.

The end product of her hard work?

No hidden rust in our taillight panel.
After about an hour of grinding we were at a stop. We made some good progress though.
Right side.

Left side.

Unfortunately, we did find some not so great things on the left side.

Friday, April 12, 2013
Learn about Kaido Style.
http://www.speedhunters.com/2013/04/the-anatomy-of-the-kaido-racer/
Enjoy this lovely article explaining what the current Kaido style is over in Japan. We won't be going full Kaido, but I have always been fascinated by these cars and I'm sure some Kaido influence will seep in. This is what makes me want to run the front mount oil cooler.
Enjoy this lovely article explaining what the current Kaido style is over in Japan. We won't be going full Kaido, but I have always been fascinated by these cars and I'm sure some Kaido influence will seep in. This is what makes me want to run the front mount oil cooler.
Wednesday, April 10, 2013
Engine management and ECU's.
So we talked about fuel. The other thing needed for engine propulsion is spark and that's easy. The factory system uses a coil-on-plug setup. That means each cylinder has it's own spark plug and coil with no distributor. The factory system is very robust but if we need a cleaner spark there are plenty of aftermarket coil's or we can retrofit coils from another car. The coils are driven by the ECU (engine control unit).
In order to understand how important the ECU is, lets take a minute and talk about what it takes to make an engine not only run, but make tons of power.
The ECU takes inputs from the crankshaft and camshafts as well as various sensors around the engine bay to determine how much air and fuel are needed at any time. Example; when you first start your car. It's cold. The ECU reads the temperature of the air coming in and add's more fuel and raises the idle so that the engine heats up faster. You go to leave your parking spot, the ECU monitors throttle position, engine temperature, air temperature, fuel pressure and the amount of air coming in and adjusts spark and fuel to accommodate your driving. Once the engine warms up, the thermostat opens and coolant flows through the radiator. This signals the ECU to lower the fuel going in. Now your on the freeway. The ECU is monitoring engine speed, throttle position and air coming in. You stab the pedal to pass, the ECU calculates the air coming in and adds fuel to mix it to a perfect air/fuel ratio.
Oh yeah, it does all those calculations IN REAL TIME. It manages 4-8 inputs and outputs at any given time, and it's only the size of a double disc CD case.
So now that we know how complicated of a box it is, how can we make it better?
Piggy Back
If the factory ECU is does all of that, and is only "good" we need to work hard to make it better. The easiest option is to use a piggyback system and trick the ECU. By using a small collection of other black boxes we can trick the ECU into giving more air or fuel. Basically we make the ECU think it's giving us 1 part air and it's actually giving 3 parts air. This is a messy way to go about things, but it's cheap and functional. The setup would consist of a electronic boost controller to adjust turbo pressure and an electronic Air/Fuel adjustment controller. The amount of fiddling would be ridiculous. Cost wise this could run $150-300 a computer so up to $600.
Nistune
Nistune is an interesting option. We take our factory ECU and we add a circuit board that would allow us to connect a laptop and adjust air/fuel ratio templates and monitor sensors in real time. These templates are referred to as "maps" as in fuel/RPM maps. This system allows for maps to be downloaded and uploaded so we could find someone with a similar system and install their maps cutting down on setup time. The only downside is there is no Nistune dealers in our area so we would be on our own for optimizing and tweaking the maps. Nistune does not require a new ECU or any special wiring on the car's end. A Nistune licence and control software usually costs between $500-600.
Full Engine Management Solution.
Haltech. Greddy Emanage. Apexi PowerFC. These are full management systems that require a lot of rewiring. Their complicated, horribly expensive ($1200-1700) and incredibly sensitive to adjustments. However their level of adjustment makes them a must for the 500-700hp crowd. Also, requires a good shop who knows the software to really dial a car in. Way more than we need.
Why not the factory ECU? For now that's probably fine. It'll run, but if we want to get the most out of our fuel and spark and air combination we need some adjustability in the ECU. Think of it this way. On an RB25 the factory ECU will get it running smoothly at 250hp, but the exact same car with a dialed in Nistune would be 300-320hp and would have better fuel economy.
For us, with our car? The factory ECU will be fine at first and we would want to get the bugs worked out, but eventually a Nistune board is probably going to be installed. It seems like the most cost effective way to get to our goals without going full engine management.
Tuesday, April 9, 2013
How to build a fuel system.
So we need to take a carb'd car and set it up for fuel injection. This is a large job, but it's more tedious work than actual hard work.
Here's a sketch of what we need to do.
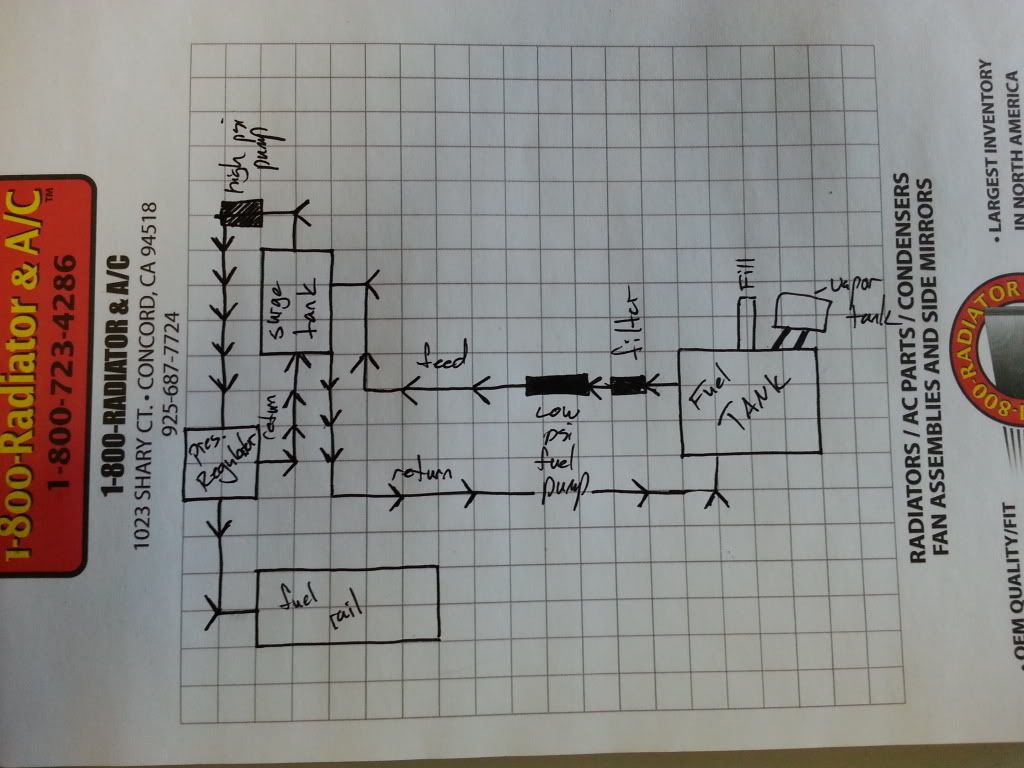
So the idea is to take our stock tank, which has no baffling and use it to feed a surge tank. The surge tank will be a metal tank that holds 1 or 1.5 gallons of fuel and will be pressurized by a low pressure pump. The pressurized surge tank ensures that no matter how hard we throw the car sideways we will always have fuel.
Fuel goes from the surge tank, through a high pressure pump into an adjustable fuel pressure regulator (FPR). This will allow us to set our fuel PSI at the rail to whatever factory settings would be for our engine. Also, when we turn up the boost we can use the FPR to add more fuel to match the increase in air.
The FPR has two outputs. One goes to the fuel rail which will be run in a "deadhead" setup. This means the fuel return does not come off the rail. A fuel rail usually has an input on one side and an output on the other. In this setup it's just an input.
The other port on the FPR is our fuel return which feeds back to the surge tank.
The surge tank will have a fuel return back to the tank.
This is a sealed system that could be used on any car that is carb'd that you want to switch to fuel injection. You just have to find room for everything.
Cost on all this fun? We need hard fuel lines, braided fuel lines, a handful of fittings, a surge tank, two fuel pumps, a FPR, a fuel pressure gauge and maybe a fuel rail. A good rail should come with the engine, but who knows. Cost wise we're looking at $400-500 to set everything up.
Here's a sketch of what we need to do.
So the idea is to take our stock tank, which has no baffling and use it to feed a surge tank. The surge tank will be a metal tank that holds 1 or 1.5 gallons of fuel and will be pressurized by a low pressure pump. The pressurized surge tank ensures that no matter how hard we throw the car sideways we will always have fuel.
Fuel goes from the surge tank, through a high pressure pump into an adjustable fuel pressure regulator (FPR). This will allow us to set our fuel PSI at the rail to whatever factory settings would be for our engine. Also, when we turn up the boost we can use the FPR to add more fuel to match the increase in air.
The FPR has two outputs. One goes to the fuel rail which will be run in a "deadhead" setup. This means the fuel return does not come off the rail. A fuel rail usually has an input on one side and an output on the other. In this setup it's just an input.
The other port on the FPR is our fuel return which feeds back to the surge tank.
The surge tank will have a fuel return back to the tank.
This is a sealed system that could be used on any car that is carb'd that you want to switch to fuel injection. You just have to find room for everything.
Cost on all this fun? We need hard fuel lines, braided fuel lines, a handful of fittings, a surge tank, two fuel pumps, a FPR, a fuel pressure gauge and maybe a fuel rail. A good rail should come with the engine, but who knows. Cost wise we're looking at $400-500 to set everything up.
Saturday, April 6, 2013
Progress, sweet progress.
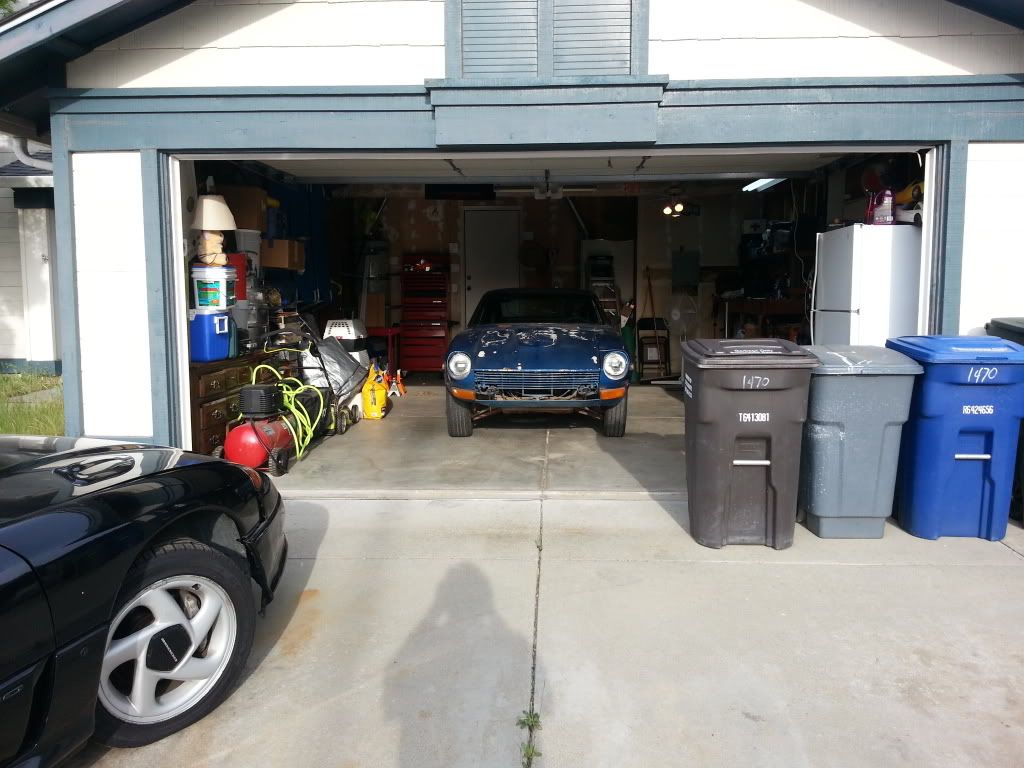
So, we can start working on the car now. Shout out to my Dad for helping shove this bad boy in the garage.
Wednesday, April 3, 2013
What's it going to cost? RB26DETT
So. What's the biggest motor we can use? The RB26DETT. That jumble of letters and numbers means 2.6l, Twin cam's and two turbo's.
 So. As you can see, it's also the most expensive engine we can run. Couple of problems. RB26's always came in all wheel drive from the factory. That means it has a special transmission and oil pan setup. We don't want either of those, so we need to find an RB26 engine, no transmission. If we shop around, we should be able to get one for $2500-3500 shipped. If not, we have to buy a set and try to sell the transmission. Not advised though. No one in America needs an AWD transmission unless there trying to convert their car to AWD.
So, we need a transmission. The RB25DET rear wheel drive transmission is exactly what we need and can be found on eBay for $650-1200 shipped depending on what kind of deal we find.
Once in a blue moon I've found RB26's being sold with RB25 transmissions. That would be ideal, but we can't count on finding one.
We still need the $500 oil pan, about $500 in maintenance, the $200 boost controller and the $400 intercooler.
Hitting our goal? Done. With 280hp out of the box, with the custom exhaust and turbo elbow/downpipe by the time we turn the boost up a couple of points and add more fuel we should be above 300hp at the wheels. This is the easiest engine to hit our goals, but the most complicated engine to swap in.
So total cost? $4750-$5500. See something interesting there? The same budget to swap in and modify an RB20 or RB25 and we could have an RB26DETT for close to the same money. It's a larger investment in the motor and transmission's initial cost, but in the long run we can have exotic sports car sound and power for the same cost as the single turbo RB25.......
Still not sure which engine to run though. The RB20 can rev to 8000rpm and has a certain appeal in being the cheapest yet still making good power. The RB26 is quite literally "The Heart of Godzilla". This is the motor that got the Skyline banned from Australian motorsports. In the middle you have the RB25, which is a good middle point between the two.
Go Youtube RB26 sounds. It's insane how good it sounds. I think it's probably the best option, but we'll see. We have a lot of work to do before we have to make a serious choice about our motor.
Tuesday, April 2, 2013
What's it going to cost? RB25DET.
So, the RB20 is a good entry level Nissan 6 cylinder, but what's the next step up? The RB25DET of course.

So this is the RB25DET and this is a typical ad. Like the RB20 yesterday we need to read the ad because due to the popularity of the RB25 you will find more people trying to make full motor set money on just an engine, or an engine without an ECU or wiring.
As with the RB20, we're looking for a full motor set with transmission, ECU, UNCUT wiring harness and all turbo/accessories. This one above has all off that. $2200 shipped to our door.
So the RB25 is a little different than the RB20, but not by much. We still need the $500 oil pan. We still need to budget about $500 in maintenance. We still need the $200 Boost controller. There is a few small changes we need to make though.
The over the valve cover pipe on the RB20DET is a great design. On the RB25 it's not. More turbo pressure requires more air and fuel flow. Also, in the interest of only making intercooler pipes once we will replace the intake manifold with a front facing design. Like this.

This does two things. It shortens the charge pipes on the intercooler. Shorter pipes means the air has to travel a shorter distance in the pipes meaning better throttle response and less turbo lag. It also looks a lot better. Cost? $300-400 depending on vendor and if I want it polished or not.
Now that we can use a standard intercooler the price actually will go up a little. Plan $400 for an intercooler with pipes for a good unit.

This might be a little aggressive, but you get the idea.
So now that it's mounted and running, how about our goal?
The RB25DET is rated at 250hp out of the box. By the time we factor in the fuel system and custom exhaust we really don't need much to hit 300hp. Turn up the boost and the fuel and with a careful eye we can rock 300hp out of the box. Ideally, we'd upgrade the turbo while it's out of the car and install a steel wheel.

This company upgrades the factory turbocharger with steel wheels that have been made special. It's not uncommon for people to make 300-350 horsepower at the wheels with stock fuel and engine management. We'll be looking at engine management later this week along with the fuel system that needs to be made. With our fuel system and some tuning we could probably dial this turbo in anywhere between 300-400 horsepower at the wheels. Cost for the steel wheel service? $800.
So, what's an RB25DET cost? $4700-$5500 depending on whether or not we go with the upgraded turbo.
Tomorrow we look at the king snake of RB motors, the RB26DETT.

So this is the RB25DET and this is a typical ad. Like the RB20 yesterday we need to read the ad because due to the popularity of the RB25 you will find more people trying to make full motor set money on just an engine, or an engine without an ECU or wiring.
As with the RB20, we're looking for a full motor set with transmission, ECU, UNCUT wiring harness and all turbo/accessories. This one above has all off that. $2200 shipped to our door.
So the RB25 is a little different than the RB20, but not by much. We still need the $500 oil pan. We still need to budget about $500 in maintenance. We still need the $200 Boost controller. There is a few small changes we need to make though.
The over the valve cover pipe on the RB20DET is a great design. On the RB25 it's not. More turbo pressure requires more air and fuel flow. Also, in the interest of only making intercooler pipes once we will replace the intake manifold with a front facing design. Like this.
This does two things. It shortens the charge pipes on the intercooler. Shorter pipes means the air has to travel a shorter distance in the pipes meaning better throttle response and less turbo lag. It also looks a lot better. Cost? $300-400 depending on vendor and if I want it polished or not.
Now that we can use a standard intercooler the price actually will go up a little. Plan $400 for an intercooler with pipes for a good unit.
This might be a little aggressive, but you get the idea.
So now that it's mounted and running, how about our goal?
The RB25DET is rated at 250hp out of the box. By the time we factor in the fuel system and custom exhaust we really don't need much to hit 300hp. Turn up the boost and the fuel and with a careful eye we can rock 300hp out of the box. Ideally, we'd upgrade the turbo while it's out of the car and install a steel wheel.
This company upgrades the factory turbocharger with steel wheels that have been made special. It's not uncommon for people to make 300-350 horsepower at the wheels with stock fuel and engine management. We'll be looking at engine management later this week along with the fuel system that needs to be made. With our fuel system and some tuning we could probably dial this turbo in anywhere between 300-400 horsepower at the wheels. Cost for the steel wheel service? $800.
So, what's an RB25DET cost? $4700-$5500 depending on whether or not we go with the upgraded turbo.
Tomorrow we look at the king snake of RB motors, the RB26DETT.
Monday, April 1, 2013
What's it going to cost? RB20DET
So now that we have our cross member to point us in a certain direction we need to pick between the three engines. RB20, RB25 and RB26. With our 300hp at the wheel goal let's look at each one and break down what the cost is going to be to 1.) Get it mounted and make it run, and 2.) Hit our 300whp goal. We're only going to talk about the engine bay at this
The RB20DET.

Our main source for a lot of things will be eBay. Some of the best deals can be found there. When shopping for an engine on eBay you have to really do your homework. This auction is a "Buy it Now" which means no bidding, just click to order. You have to read the ad carefully because it's very common for them to price it like this, but not include a transmission or the ECU. A good ad will include the following.
- Complete Engine with accessories (turbo, manifolds, fuel rail, injectors, P/S and A/C pumps, belts)
- Transmission, preferably still attached (that tells us this engine and transmission came from the same car, not pieced together at a junkyard.).
- Since the transmission is still on, we can assume we have a clutch and flywheel. Also look for a shifter on that transmission. Great if it's there, but not a deal breaker.
- UNCUT wiring harness.
- ECU
- Ignitor
This is about the going rate, so for $1600 we can have a complete motor set shipped to us. This is about 80% of what we need to have a running driving sports car.
All the RB's are either a front sump oil pan or are setup for all wheel drive and have a front differential in the oil pan. All RB's need a rear sump oil pan.
So add $500 to every RB we decide to use. These are all custom made. There is a factory Nissan pan that works, but it's been out of production for about 15 years. If we stumble across a good one, we'll jump on it.
So we're up to $2100 but our RB20 can be fully mounted in our chassis.
Wait! Before the motor goes in, there's some things we need to do to prep the motor for our chassis.
- Figure about $500 in timing belt, spark plugs, water pump and gaskets to make sure our engine is going to be maintenance free for a while. During this step we will remove the valve covers to check for sludge, and to paint the valve covers to match the car.
- Power steering pump and lines will need to be removed, along with the A/C pump.
- Re-route vacuum lines and wiring to clean up the overall appearance of our engine.
So we're up to $2600. The only thing left to get our car running (aside from a fuel system, which is a whole separate issue) is an intercooler.
The interest of keeping the pipe length to a minimum our intercooler would have inlet and outlet on the same side, which is a little unusual. Cost? About $150 for the intercooler and another $150 for the pipes and connectors.
So that puts us at $2900 for a running and driving RB20DET.
In order to make more power though, we need to tweak some things.
A Boost controller ($200) will allow us to turn up the pressure, but we don't want to do that on our RB20 turbo because it has a glass compressor wheel and too much pressure will cause it to shatter and spit glass out the tailpipe.
So we replace the turbo with a RB25 turbocharger ($200-300 used on eBay) and we retain our RB20 wastegate. This combination allows us to push 14psi instead of 10psi and on a better compressor wheel. Our fuel system will include an adjustable fuel pressure regulator so with a little fiddling we should be able to get to about 250hp at the wheels. In order to hit 300hp or more at the wheels, we would have to invest in an aftermarket turbo and manifold, and bigger fuel injectors. More importantly we would have to get into engine management which means a lot of money. Most EMS kits are around $1300-1700 and require dyno tuning to really dial them in.
So what's our total for a running RB20DET? $3500-$4000 to start and we would be working towards our goal in steps. The good news, it's only one big purchase and a bunch of medium and little purchases.
Next time we look at the RB25DET and see how different our planning needs to be for a measly 500cc and 40 more horse power.
Subscribe to:
Posts (Atom)